Saturday, December 26, 2020

B17


Back from the shop

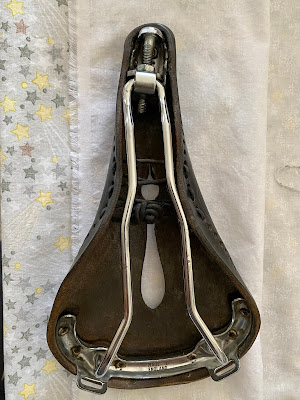
Christmas arrived a couple days early this year, when I received word from a repair shop that my Brooks B17 Imperial bicycle saddle could be saved.


I’ve been a huge fan of the Brooks England’s handmade leather saddles for many years, crediting them for letting me ride my bikes comfortably for thousands of miles.


This particular B17 has been with me for so long now that it’s almost a part of me. I’ve ridden on it for more than 6,000 miles, including over major parts of the Great Divide mountain bike route between Canada and Mexico and the northern tier route between Anacortes WA and Bar Harbor ME.


So when the saddle’s leather started drooping and the tightening mechanism stopped working properly a year ago, I was saddened at the thought that I might soon have to say adios to an old friend.


Sick saddle
Critics will wonder what all the fuss is about, because they say the saddles are anything but comfortable for them. It’s true that the B17s, which the UK-based Brooks has been manufacturing for more than 100 years, are not instant-gratification technology. In fact, right out of the box, the saddles can be hard and unyielding—a real pain in the ass.

To make them comfortable, they need to be broken in gradually by riding them hundreds of miles. Once the leather softens and conforms to a rider’s sit bones, the saddle will fit a rider’s backside like a glove.


When I first realized that something was amiss with my B17 Imperial last year, I bought a new one, just in case the old one absolutely had to be replaced.


I have been riding the new B17 for short distances for several months. But with fewer than 500 miles on the saddle, it is still hard as a rock and nowhere near broken-in enough for serious touring.


Fortunately, in early December, I found a Brooks England-approved saddle repairman in Philadelphia, who mended my old saddle for $20. For him, a simple fix.


“It looks like it’s got plenty of life left,” said Simon Firth, of Firth & Wilson Transport Cycles, in the city of brotherly love.


Music to my ears. Now I am looking forward to all the new adventures I’ll be having riding on my old B17,  while continuing to break in the new one, just in case.


Back on the Troll, where it belongs


Monday, December 14, 2020

Stealth cyclists sleep cheap


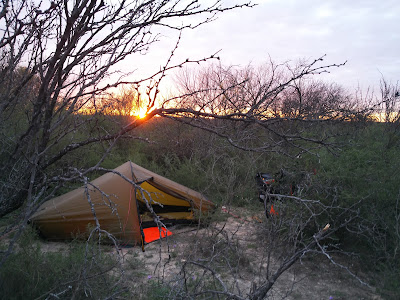
Our stealth site in Wyoming's Great Basin

It’s hard to imagine a less expensive way to travel than by bicycle, particularly if you don’t mind camping.


Bicycle touring is even cheaper if you are OK “stealth camping”—that is, discreetly pitching your tent or hanging your hammock in the woods on the side of the road, and making do without the bathrooms, picnic tables, fire rings and similar luxuries provided at established campgrounds that charge fees.


My friend Jim and I got a taste of stealth camping on a remote, 400-mile section of the Great Divide Mountain Bike Route between Pinedale WY and Steamboat Springs CO last summer.


On this part of the GDMBR, which goes through Wyoming’s beautiful but austere Great Basin, you have no choice but to stealth camp, because motels and campgrounds are as rare as potable water on the route.


There is plenty of publicly owned land, however, where you are free to camp pretty much wherever you want, and that’s what we did.


I’m fine with stealth camping on public land. But I don’t believe I would be comfortable camping without permission on private land, particularly where signs discouraging trespassing are posted.


Many touring cyclists stealth camp as much as possible, though, at least partly for economic reasons. 


“I used to call it, eating out of the garbage can and sleeping in the ditch,” says George Recker, 74, who went on his first bike tour in the late 1960s and has been a stealth-camping aficionado ever since.


Recker stealth site in Texas

Key things to look for in potential stealth sites are flat spots for tents, nearby water sources, cover, and perhaps a great view, veteran cyclists say.


Recker’s eight survival rules:

  1. Don’t be seen leaving the road.
  2. Don’t camp where a car can be driven.
  3. Eliminate or cover reflective material.
  4. No fires.
  5. Be quiet.
  6. Set up late and leave early, if necessary.
  7. Opt for subdued tent colors rather than bright ones.
  8. Avoid sites within sight of buildings.

“I enjoy the process of finding interesting camps,” says Recker.


“It’s not always possible, but most of the time if you don’t panic a decent place appears . . . away from the fray.”


“The closer to dark the less picky I get.”


Recker on gravel near Eugene OR


One of our stealth sites in southern Wyoming. At least we weren't in the middle of the road!


Monday, December 7, 2020

Meals on (2) wheels

Breakfast on the GDMBR, l-r: Doug, Mike

For bikepackers, the lighter their meals on wheels, the better—as long as the food they choose provides the energy they need to continue pedaling.


There are three basic food-packing strategies for bike packers.


Some veteran bikepackers, in the interests of shaving ounces from their loads, do much of their dining at the sometimes widely-dispersed restaurants and convenience stores along the way. During these stops, they stock up on enough sandwiches, snacks and other cold fare to get them to the next resupply point. This approach lets them travel without stoves, fuel and other cooking gear.


Other bikepackers bring stoves but try to limit the weight of their own kits by relying mostly on commercially prepared freeze-dried fare for their meals.


Still other cyclists, like me, also bring stoves and other cooking supplies but put together most of their own meals, either in advance or on the fly.


I feel that my homemade meals provide me with more energy—and are less expensive—than the commercially prepared freeze-dried meals.


A five-day supply of my homemade provisions is the most I have carried. For longer trips, I send general delivery resupply caches to post offices along the route.


To keep the weight of my homemade bikepacking meals down, I rely mostly on dry ingredients: oatmeal, dehydrated vegetables and beans, instant brown rice, pasta or noodles and instant potatoes.


My standard bikepacking breakfast starts with a tablespoon of instant coffee mixed with an envelope of cocoa mix. 


I add two packets of instant oatmeal, three tablespoons of instant milk (I have been using nonfat but am planning to switch to dried whole milk for the extra calories), and an envelope of vanilla-flavored instant breakfast.


If I am in a hurry to get down the road, I just soak this mixture in cold water while I am packing camp and consume it cold, without firing up the stove.


After I finish the oatmeal, I fill my pot with water and a packet of Emergen-C, a vitamin-infused powdered beverage. This helps clean the pot and gets me down the road, without wasting water. (I have learned not to waste water during a bike-packing tour, particularly when, as is often the case, I have to find it, filter it or purify it.)


For lunch, I usually just snack on whatever I have been able to scrounge up in convenience stores along the route. I particularly like tortillas (preferably whole wheat) slathered with peanut butter and honey and/or bananas. Cheese, jerky, chocolate milk and fig bars are also great options.


My go-to bikepacking dinner starts with a packet of tuna as an appetizer.


For the main course, I combine 1/2 cup of instant brown rice with a couple of tablespoons of dehydrated beans and veggies in water, and either a packet of NongShim gourmet Ramen (definitely worth the extra price) or a spoonful of Massel stock powder. I also usually add a couple of tablespoons of instant potatoes to the mixture.


This concoction fills my belly and gives me good energy the next day.


On the advice of other touring cyclists, I am planning to start adding a generous dash of coconut oil to my breakfasts and a similar amount of olive oil to my evening meals.


In addition, I plan to start adding some fresh veggies, including sauteed onions, bell peppers and garlic, to my dinners.


Kitchen at Mosquito Lake, MT, GDMBR

I have also been sold on the concept of downing a shot of decent whiskey after dinner, largely for the additional calories.


Other combinations I intend to add to the dinner menu in the future include red lentils with quinoa and presoaked green lentils with instant brown rice.


Fresh fruits and vegetables, Subway sandwiches, and other restaurant fare, are great additions to the touring bikepacker’s diet, and these are often available in trailside towns.


On the recommendation of Mike Evanoff, a bike touring veteran who accompanied me on a section of the Great Divide Mountain Bike Route last summer, I plan to start adding dried berries, raisins and nuts to my oatmeal breakfasts.


Jim Ketcham-Colwill fixing dinner south of Pinedale WY, GDMBR


“I keep the brown sugar separate, and add a packet of coconut oil once it (oatmeal) is cooked,” Evanoff says.

“I just bring the mix to a boil, simmer for a minute and then put the pot into a cozy to sit for a while.

Dried whole milk is another good ingredient to add if you are so inclined.”


You won’t regret eating as well as possible on your own rides. Good meal choices will not only help ensure that you are physically capable of completing your tour but may also enhance the prospects that you will enjoy the journey.


Dave Green enjoying predawn breakfast on the TransVirginia 


Wednesday, December 2, 2020

Hanging in there


Stronger fingers make for stronger climbers.


And by using hangboards, climbers of all ages, including my fellow seniors, can increase the strength of their fingers and grips at home—without having to break the piggy bank.


Hangboards, generally made out of wood or grit-impregnated plastic, usually include a variety of shapes and sizes of holds to hang on.


They’re great off-season training devices for climbers who don’t have access to indoor climbing gyms or don’t want to climb indoors. They are also good options for climbers who are trying to minimize their potential exposures to Covid-19 and other viral contagions.


I’ve been using hangboards regularly recently to try to get back into reasonable climbing shape in the wake of suffering a shoulder separation during a bikepacking accident more than a year ago.


Here’s some intel based on my personal experience:


First, the holds on some commercially available hangboards are too small and challenging to be of much use to anybody other than a small elite of rockclimbing superstars.


Second, to avoid debilitating injury, warm up thoroughly before every hangboarding session—and don’t push the envelope on smaller holds until you are really up for the challenge.


Third, wood hangboards are a lot easier on the fingertips than grit-impregnated plastic ones.


Fourth, there’s no need to spend a small fortune on a hangboard.


On the latter point: After many years of getting nowhere on a series of expensive plastic boards, I finally salvaged my current go-to favorite from a scrap heap in the garage.


My favorite board is just a board

It’s a 28-inch-long piece of 2”x 4” that I screwed into a beam in the basement. Cost: zero.


It’s so easy on my fingers that I have been using it regularly for more than a month now, and I can tell that my fingers are getting stronger.


As my fingers get even stronger, I will start adding weight to my climbing harness to add to my hanging load.


I’ve been using my homemade board every other day, doing ten sets of two ten-second hangs, with ten seconds between the reps and a four-minute rest between sets.


Afterward, I run through a set of slopers, edges and pinches on one of the plastic boards.


I plan to maintain the drill through the winter.


How well this program works won’t be known for sure until spring, when I hope to resume climbing outdoors on real rock.


In the meantime, I will be hanging out a lot in the basement.


Sticker shock on this one


My favorite plastic hangboard. So iLL Iron Palm. Good slopers, edges and pinches. A new wood version of this looks particularly interesting.


John Muir Trail

Happy to report that I summited 14,505-foot Mt. Whitney August 21, capping off a 208-mile hike of California’s John Muir Trail. The JMT, whi...